Tips & Techniques
Tips and techniques may vary by product. See product data sheet on website, paintdocs.com or via QR code scan located on packaging.
Caulk removal – wear protective goggles and gloves
- Remove all existing caulk – use a caulk remover (Goo-Gone) to soften the caulk followed by a caulk scraper to remove the caulk.
- Clean the surfaces thoroughly to remove: loose particles, grease, dirt, oil, wax, loose paint, dust, and soap film.
- Remove any mold/mildew with a 4:1 mix of water to bleach, followed by a detergent that does not contain ammonia. Rinse surfaces and dry thoroughly.
Caulk application – all surfaces must be structurally sound (repair any damaged surface area)
- Use low-tack painter’s tape to mask both sides of the intended caulk area for a clean professional finish.
- Scan QR code on White Lightning package for product data sheet application details.
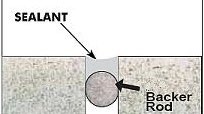
- IF, joints are over 1/2” deep; purchase and install closed-cell foam backer rod (just before caulk application). This prevents three-sided adhesion (leading to caulk failure). Backer rod should be 25% wider than the joint width so it remains in place during caulk application. Top of backer rod should be no more than 1/2” from surface of substrate.

- Cut caulk cartridge tip at 45° angle. Using a caulk gun – apply caulk in a smooth continuous motion. A 6:1 caulk gun thrust-ratio is ok for small projects, a 12:1 thrust-ratio is better (prevents hand fatigue) for large projects: windows, doors, baseboards, etc.
- As soon as you apply the caulk, glide your finger (or a caulk tooling blade) over the caulk to smooth/tool it and ensure good contact with the surfaces.
- Immediately and carefully remove any painter’s tape after smoothing/tooling the caulk.
Concrete: Allow 30 days for new concrete to cure prior to applying caulk. Allow 24hrs for concrete to dry (after rain) before caulking.
